Treasure Map (Tier 2): Difference between revisions
No edit summary |
m Text replacement - "=~1/" to "=1/" |
||
| (42 intermediate revisions by 6 users not shown) | |||
| Line 1: | Line 1: | ||
{{Item|name=Treasure Map|_id=443|image=[[file: | <div id="contentSub"><div id="mw-content-subtitle"><span class="mw-redirectedfrom">(Looking for a different tier of map? [[Treasure Map (Tier 1)]], [[Treasure Map (Tier 3)]])</span></div></div> | ||
{{Item|name=Treasure Map|_id=443|image=[[file:Treasure map (tier 2).png]]|aka=|inspect=It's a map to a hidden treasure location|edible=No|equipable=No|iou=No|stackable=No|tradeable=No|quest=No}} | |||
[[Treasure Map (Tier 2)]] is a semi-rare item that can be obtained from medium level [[ | [[Treasure Map (Tier 2)]] is a semi-rare item that can be obtained from medium level [[Non-player Character|NPCs]]. Solving a treasure map involves going to the location shown on the map with a [[Shovel]], and digging in the exact spot needed. Make sure to have at least 3-5 open [[inventory]] spaces to hold the newly acquired items. | ||
If you need help finding a location, you can view the | If you need help finding a location, you can [[Treasure_Map_(Tier_2)#Possible_Solutions|view the map below]]. | ||
You can only possess one singular Treasure Map at a time, whether it's in your inventory or your [[Bank]]. This means you can't even hold multiple maps across different tiers simultaneously (e.g., Tier 2 and Tier 1). If a map proves too difficult to reach or complete, it's best to discard it in order to obtain a new one. | |||
If you [[Death|die]] while holding a treasure map, regardless of safe slots, it will be destroyed. | |||
{{DropSources}} | |||
=== Wastelands Increased Drop Rates === | |||
The [[Wastelands]] are the only area in ''[[HighSpell]]'' that offer increased Treasure Map drop rates. [[Bestiary|Monsters]] here (excluding [[Damogui]]) have a 20% higher chance to drop Treasure Maps<ref>[https://highspell.wiki/w/Updates/Leather_Armour,_Wastelands_Update,_and_More] From the <i>Updates/Leather Armour, Wastelands Update, and More</i> update.</ref>, rewarding those who brave the risk. | |||
== Base Rewards == | == Base Rewards == | ||
A '''Treasure Map (Tier 2)''' always contains the following item(s) | A '''Treasure Map (Tier 2)''' always contains the following item(s) | ||
{| class="wikitable" | {| class="wikitable" | ||
! colspan="2" | Item | ! colspan="2" | '''Item''' | ||
! Quantity | ! '''Quantity''' | ||
! Rarity | ! '''Rarity''' | ||
! Value | ! '''Value''' | ||
|- | |- | ||
{{LootItem|Item=Coins|MinimumQuantity=2000|Rarity=Always | {{LootItem|Item=Coins|MinimumQuantity=2000|Rarity=Always}} | ||
|} | |} | ||
== Potential Rewards == | == Potential Rewards == | ||
| Line 31: | Line 31: | ||
* '''1st roll:''' 100% | * '''1st roll:''' 100% | ||
* '''2nd roll:''' | * '''2nd roll:''' 75% | ||
* '''3rd roll:''' | * '''3rd roll:''' 50% | ||
* '''4th roll:''' 25% | * '''4th roll:''' 25% | ||
* '''5th roll:''' 25% | * '''5th roll:''' 25% | ||
Only successful rolls yield extra loot. | Only successful rolls yield extra loot. | ||
{{AddLoot|item=Coins|minquantity= | {{AddLoot|item=Coins|minquantity=625|maxquantity=2500|rarity=1/6.6}} | ||
{{AddLoot|item=Warp Scroll|minquantity= | {{AddLoot|item=Fury Scroll|minquantity=15|maxquantity=60|rarity=1/10}} | ||
{{AddLoot|item=Alchemy Scroll|minquantity= | {{AddLoot|item=Warp Scroll|minquantity=4|maxquantity=15|rarity=1/10}} | ||
{{AddLoot|item=Blood Scroll|minquantity= | {{AddLoot|item=Alchemy Scroll|minquantity=5|maxquantity=20|rarity=1/10}} | ||
{{AddLoot|item=Rage Scroll|minquantity=10|maxquantity=40|rarity=1/10 | {{AddLoot|item=Blood Scroll|minquantity=4|maxquantity=15|rarity=1/10}} | ||
{{AddLoot|item=Coal|minquantity= | {{AddLoot|item=Rage Scroll|minquantity=10|maxquantity=40|rarity=1/10}} | ||
{{AddLoot|item=Wizard's Bow| | {{AddLoot|item=Coal|minquantity=2|maxquantity=10|IOU=1|rarity=1/20}} | ||
{{AddLoot|item=Marlin|minquantity= | {{AddLoot|item=Wizard's Bow|minquantity=1|rarity=1/20}} | ||
{{AddLoot|item=Potion | {{AddLoot|item=Marlin|minquantity=6|maxquantity=25|IOU=1|rarity=1/20}} | ||
{{AddLoot|item=Potion | {{AddLoot|item=Potion Of Strength (2)|minquantity=1|maxquantity=5|IOU=1|rarity=1/20}} | ||
{{AddLoot|item=Beer|minquantity=2|maxquantity=10|rarity=1/50 | {{AddLoot|item=Potion Of Forestry (2)|minquantity=1|maxquantity=5|IOU=1|rarity=1/33.3}} | ||
{{AddLoot|item=Green Headband| | {{AddLoot|item=Beer|minquantity=2|maxquantity=10|IOU=1|rarity=1/50}} | ||
{{AddLoot|item=Blue Headband| | {{AddLoot|item=Green Headband|minquantity=1|rarity=1/100}} | ||
{{AddLoot|item=Blue Wizard's Gloves| | {{AddLoot|item=Blue Headband|minquantity=1|rarity=1/100}} | ||
{{AddLoot|item=Coronium Helm| | {{AddLoot|item=Blue Wizard's Boots|minquantity=1|rarity=1/200}} | ||
{{AddLoot|item=Coronium Full Helm| | {{AddLoot|item=Blue Wizard's Gloves|minquantity=1|rarity=1/200}} | ||
{{AddLoot|item=Coronium Chestplate| | {{AddLoot|item=Royal Cape|minquantity=1|rarity=1/285.7}} | ||
{{AddLoot|item=Coronium Chainmail Body| | {{AddLoot|item=Coronium Helm|minquantity=1|rarity=1/285.7}} | ||
{{AddLoot|item=Coronium Platelegs| | {{AddLoot|item=Coronium Full Helm|minquantity=1|rarity=1/285.7}} | ||
{{AddLoot|item=Coronium Gloves| | {{AddLoot|item=Coronium Chestplate|minquantity=1|rarity=1/285.7}} | ||
{{AddLoot|item=Coronium Shield| | {{AddLoot|item=Coronium Chainmail Body|minquantity=1|rarity=1/285.7}} | ||
{{AddLoot|item=Coronium Longsword| | {{AddLoot|item=Coronium Platelegs|minquantity=1|rarity=1/285.7}} | ||
{{AddLoot|item=Coronium Pickaxe| | {{AddLoot|item=Coronium Gloves|minquantity=1|rarity=1/285.7}} | ||
{{AddLoot|item=Coronium Battleaxe| | {{AddLoot|item=Coronium Shield|minquantity=1|rarity=1/285.7}} | ||
{{AddLoot|item=Coronium Great Sword| | {{AddLoot|item=Coronium Longsword|minquantity=1|rarity=1/285.7}} | ||
{{AddLoot|item=Coronium Scimitar| | {{AddLoot|item=Coronium Pickaxe|minquantity=1|rarity=1/285.7}} | ||
{{AddLoot|item=Coronium Hatchet| | {{AddLoot|item=Coronium Battleaxe|minquantity=1|rarity=1/285.7}} | ||
{{AddLoot|item=Coronium Arrows|minquantity=25|maxquantity=100|rarity=1/ | {{AddLoot|item=Coronium Great Sword|minquantity=1|rarity=1/285.7}} | ||
{{AddLoot|item= | {{AddLoot|item=Coronium Scimitar|minquantity=1|rarity=1/285.7}} | ||
{{AddLoot|item= | {{AddLoot|item=Coronium Hatchet|minquantity=1|rarity=1/285.7}} | ||
{{AddLoot|item= | {{AddLoot|item=Coronium Arrows|minquantity=25|maxquantity=100|rarity=1/285.7}} | ||
{{AddLoot|item= | {{AddLoot|item=Gold Ruby Necklace|minquantity=1|rarity=1/666.7}} | ||
{{AddLoot|item= | {{AddLoot|item=Ember Staff|minquantity=1|rarity=1/1000}} | ||
{{AddLoot|item=Coronium Full Helm (Silver Plating)| | {{AddLoot|item=Hydro Staff|minquantity=1|rarity=1/1000}} | ||
{{AddLoot|item=Coronium Helm (Silver Plating)| | {{AddLoot|item=Forest Staff|minquantity=1|rarity=1/1000}} | ||
{{AddLoot|item=Coronium Chestplate (Silver Plating)| | {{AddLoot|item=Coronium Full Helm (Purple Plume)|minquantity=1|rarity=1/2000}} | ||
{{AddLoot|item=Coronium Chainmail Body (Silver Plating)| | {{AddLoot|item=Coronium Full Helm (Silver Plating)|minquantity=1|rarity=1/2000}} | ||
{{AddLoot|item=Coronium Platelegs (Silver Plating)| | {{AddLoot|item=Coronium Helm (Silver Plating)|minquantity=1|rarity=1/2000}} | ||
{{AddLoot|item=Coronium Shield (Silver Plating)| | {{AddLoot|item=Coronium Chestplate (Silver Plating)|minquantity=1|rarity=1/2000}} | ||
{{AddLoot|item=Coronium Gloves (Silver Plating)| | {{AddLoot|item=Coronium Chainmail Body (Silver Plating)|minquantity=1|rarity=1/2000}} | ||
{{AddLoot|item=Coronium Full Helm (Gold Plating)| | {{AddLoot|item=Coronium Platelegs (Silver Plating)|minquantity=1|rarity=1/2000}} | ||
{{AddLoot|item=Coronium Helm (Gold Plating)| | {{AddLoot|item=Coronium Shield (Silver Plating)|minquantity=1|rarity=1/2000}} | ||
{{AddLoot|item=Coronium Chestplate (Gold Plating)| | {{AddLoot|item=Coronium Gloves (Silver Plating)|minquantity=1|rarity=1/2000}} | ||
{{AddLoot|item=Coronium Chainmail Body (Gold Plating)| | {{AddLoot|item=Coronium Full Helm (Gold Plating)|minquantity=1|rarity=1/2000}} | ||
{{AddLoot|item=Coronium Platelegs (Gold Plating)| | {{AddLoot|item=Coronium Helm (Gold Plating)|minquantity=1|rarity=1/2000}} | ||
{{AddLoot|item=Coronium Shield (Gold Plating)| | {{AddLoot|item=Coronium Chestplate (Gold Plating)|minquantity=1|rarity=1/2000}} | ||
{{AddLoot|item=Coronium Gloves (Gold Plating)| | {{AddLoot|item=Coronium Chainmail Body (Gold Plating)|minquantity=1|rarity=1/2000}} | ||
{{AddLoot|item=Coronium Shield (Gold Trim)| | {{AddLoot|item=Coronium Platelegs (Gold Plating)|minquantity=1|rarity=1/2000}} | ||
{{AddLoot|item=Coronium Shield (Silver Plating And Gold Trim)| | {{AddLoot|item=Coronium Shield (Gold Plating)|minquantity=1|rarity=1/2000}} | ||
{{AddLoot|item=Coronium Shield (Gold Plating And Gold Trim)| | {{AddLoot|item=Coronium Gloves (Gold Plating)|minquantity=1|rarity=1/2000}} | ||
{{AddLoot|item=Coronium Full Helm (Gold Plume)| | {{AddLoot|item=Coronium Shield (Gold Trim)|minquantity=1|rarity=1/2000}} | ||
{{AddLoot|item=Coronium Full Helm (Silver Plating And Gold Plume)| | {{AddLoot|item=Coronium Shield (Silver Plating And Gold Trim)|minquantity=1|rarity=1/2000}} | ||
{{AddLoot|item=Coronium Full Helm (Gold Plating And Gold Plume)| | {{AddLoot|item=Coronium Shield (Gold Plating And Gold Trim)|minquantity=1|rarity=1/2000}} | ||
{{AddLoot|item=Coronium Full Helm (Gold Plume)|minquantity=1|rarity=1/2000}} | |||
{{AddLoot|item=Coronium Full Helm (Silver Plating And Gold Plume)|minquantity=1|rarity=1/2000}} | |||
{{AddLoot|item=Coronium Full Helm (Gold Plating And Gold Plume)|minquantity=1|rarity=1/2000}} | |||
{{LootTable}} | {{LootTable}} | ||
{{ | |||
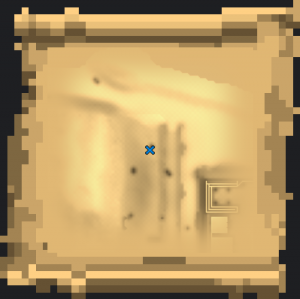
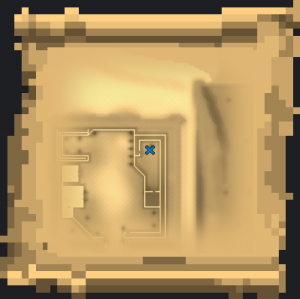
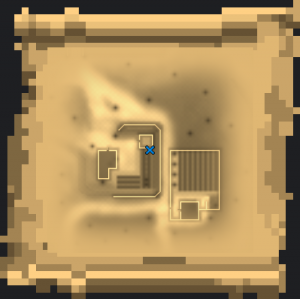
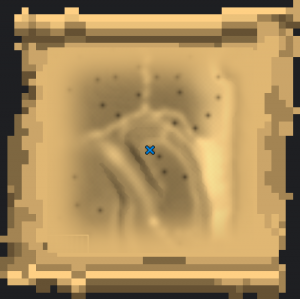
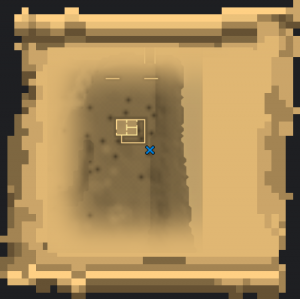
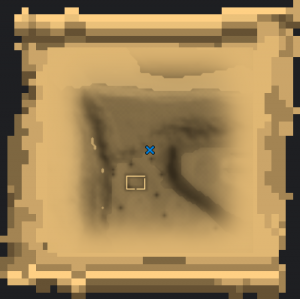
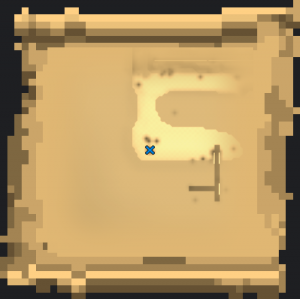
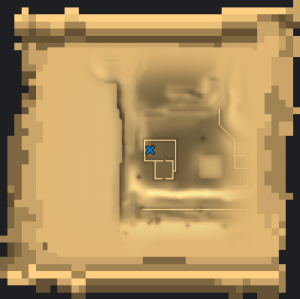
== Possible Solutions == | |||
=== Mapped Locations === | |||
For a bookmark-friendly page with just the Tier 2 locations mapped out, see → [[Treasure_Map_(Tier_2)/Locations]] | |||
{{MapEmbed|group=treasure_maps|show=Tier_2_Locations|size=520px|zoom=-1}} | |||
=== Individual Maps === | |||
{| class="wikitable" | |||
|- | |||
! colspan="2" | Map | |||
! Location | |||
! Suggested Travel | |||
|- | |||
| style="text-align: center;" | [[File:443_x107_y144.png|300px|link=]] | |||
| {{MapEmbed|xPos=107|yPos=144|size=300px|zoom=2|emoji=❌|outline=true|clean=true|coords=107,144,Underworld|lvl=Underworld}} | |||
| style="text-align: center;" | [[Underworld]] | |||
<code style="border: 1px solid var(--border-color-base) !important; background: var(--bg-contrast) !important;">x: 107, y: 144</code> | |||
| | |||
|- | |||
| style="text-align: center;" | [[File:443_x-2_y140.png|300px|link=]] | |||
| {{MapEmbed|xPos=-2|yPos=140|size=300px|zoom=2|emoji=❌|outline=true|clean=true|coords=-2,140,Underworld|lvl=Underworld}} | |||
| style="text-align: center;" | [[Underworld]] | |||
<code style="border: 1px solid var(--border-color-base) !important; background: var(--bg-contrast) !important;">x: -2, y: 140</code> | |||
| | |||
|- | |||
| style="text-align: center;" | [[File:443_x-94_y448.png|300px|link=]] | |||
| {{MapEmbed|xPos=-94|yPos=448|size=300px|zoom=2|emoji=❌|outline=true|clean=true|coords=-94,448,Underworld|lvl=Underworld}} | |||
| style="text-align: center;" | [[Underworld]] | |||
<code style="border: 1px solid var(--border-color-base) !important; background: var(--bg-contrast) !important;">x: -94, y: 448</code> | |||
| | |||
|- | |||
| style="text-align: center;" | [[File:443_x-99_y127.png|300px|link=]] | |||
| {{MapEmbed|xPos=-99|yPos=127|size=300px|zoom=2|emoji=❌|outline=true|clean=true|coords=-99,127,Overworld}} | |||
| style="text-align: center;" | [[Overworld]] | |||
<code style="border: 1px solid var(--border-color-base) !important; background: var(--bg-contrast) !important;">x: -99, y: 127</code> | |||
| | |||
|- | |||
| style="text-align: center;" | [[File:443_x60_y203.png|300px|link=]] | |||
| {{MapEmbed|xPos=60|yPos=203|size=300px|zoom=2|emoji=❌|outline=true|clean=true|coords=60,203,Overworld}} | |||
| style="text-align: center;" | [[Overworld]] | |||
<code style="border: 1px solid var(--border-color-base) !important; background: var(--bg-contrast) !important;">x: 60, y: 203</code> | |||
| | |||
|- | |||
| style="text-align: center;" | [[File:443_x-12_y312.png|300px|link=]] | |||
| {{MapEmbed|xPos=-12|yPos=312|size=300px|zoom=2|emoji=❌|outline=true|clean=true|coords=-12,312,Overworld}} | |||
| style="text-align: center;" | [[Overworld]] | |||
<code style="border: 1px solid var(--border-color-base) !important; background: var(--bg-contrast) !important;">x: -12, y: 312</code> | |||
| | |||
|- | |||
| style="text-align: center;" | [[File:443_x-61_y354.png|300px|link=]] | |||
| {{MapEmbed|xPos=-61|yPos=354|size=300px|zoom=2|emoji=❌|outline=true|clean=true|coords=-61,354,Overworld}} | |||
| style="text-align: center;" | [[Overworld]] | |||
<code style="border: 1px solid var(--border-color-base) !important; background: var(--bg-contrast) !important;">x: -61, y: 354</code> | |||
| | |||
|- | |||
| style="text-align: center;" | [[File:443_x-104_y451.png|300px|link=]] | |||
| {{MapEmbed|xPos=-104|yPos=451|size=300px|zoom=2|emoji=❌|outline=true|clean=true|coords=-104,451,Overworld}} | |||
| style="text-align: center;" | [[Overworld]] | |||
<code style="border: 1px solid var(--border-color-base) !important; background: var(--bg-contrast) !important;">x: -104, y: 451</code> | |||
| | |||
|- | |||
| style="text-align: center;" | [[File:443_x-91_y477.png|300px|link=]] | |||
| {{MapEmbed|xPos=-91|yPos=477|size=300px|zoom=2|emoji=❌|outline=true|clean=true|coords=-91,477,Overworld}} | |||
| style="text-align: center;" | [[Overworld]] | |||
<code style="border: 1px solid var(--border-color-base) !important; background: var(--bg-contrast) !important;">x: -91, y: 477</code> | |||
| | |||
|- | |||
| style="text-align: center;" | [[File:443_x116_y466.png|300px|link=]] | |||
| {{MapEmbed|xPos=116|yPos=466|size=300px|zoom=2|emoji=❌|outline=true|clean=true|coords=116,466,Overworld}} | |||
| style="text-align: center;" | [[Overworld]] | |||
<code style="border: 1px solid var(--border-color-base) !important; background: var(--bg-contrast) !important;">x: 116, y: 466</code> | |||
| | |||
|- | |||
| style="text-align: center;" | [[File:443_x174_y446.png|300px|link=]] | |||
| {{MapEmbed|xPos=174|yPos=446|size=300px|zoom=2|emoji=❌|outline=true|clean=true|coords=174,446,Overworld}} | |||
| style="text-align: center;" | [[Overworld]] | |||
<code style="border: 1px solid var(--border-color-base) !important; background: var(--bg-contrast) !important;">x: 174, y: 446</code> | |||
| | |||
|- | |||
| style="text-align: center;" | [[File:443_x189_y360.png|300px|link=]] | |||
| {{MapEmbed|xPos=189|yPos=360|size=300px|zoom=2|emoji=❌|outline=true|clean=true|coords=189,360,Overworld}} | |||
| style="text-align: center;" | [[Overworld]] | |||
<code style="border: 1px solid var(--border-color-base) !important; background: var(--bg-contrast) !important;">x: 189, y: 360</code> | |||
| | |||
|- | |||
| style="text-align: center;" | [[File:443_x240_y393.png|300px|link=]] | |||
| {{MapEmbed|xPos=240|yPos=393|size=300px|zoom=2|emoji=❌|outline=true|clean=true|coords=240,393,Overworld}} | |||
| style="text-align: center;" | [[Overworld]] | |||
<code style="border: 1px solid var(--border-color-base) !important; background: var(--bg-contrast) !important;">x: 240, y: 393</code> | |||
| | |||
|- | |||
| style="text-align: center;" | [[File:443_x237_y317.png|300px|link=]] | |||
| {{MapEmbed|xPos=237|yPos=317|size=300px|zoom=2|emoji=❌|outline=true|clean=true|coords=237,317,Overworld}} | |||
| style="text-align: center;" | [[Overworld]] | |||
<code style="border: 1px solid var(--border-color-base) !important; background: var(--bg-contrast) !important;">x: 237, y: 317</code> | |||
| | |||
|- | |||
| style="text-align: center;" | [[File:443_x219_y285.png|300px|link=]] | |||
| {{MapEmbed|xPos=219|yPos=285|size=300px|zoom=2|emoji=❌|outline=true|clean=true|coords=219,285,Overworld}} | |||
| style="text-align: center;" | [[Overworld]] | |||
<code style="border: 1px solid var(--border-color-base) !important; background: var(--bg-contrast) !important;">x: 219, y: 285</code> | |||
| | |||
|- | |||
| style="text-align: center;" | [[File:443_x275_y233.png|300px|link=]] | |||
| {{MapEmbed|xPos=275|yPos=233|size=300px|zoom=2|emoji=❌|outline=true|clean=true|coords=275,233,Overworld}} | |||
| style="text-align: center;" | [[Overworld]] | |||
<code style="border: 1px solid var(--border-color-base) !important; background: var(--bg-contrast) !important;">x: 275, y: 233</code> | |||
| | |||
|- | |||
| style="text-align: center;" | [[File:443_x216_y174.png|300px|link=]] | |||
| {{MapEmbed|xPos=216|yPos=174|size=300px|zoom=2|emoji=❌|outline=true|clean=true|coords=216,174,Overworld}} | |||
| style="text-align: center;" | [[Overworld]] | |||
<code style="border: 1px solid var(--border-color-base) !important; background: var(--bg-contrast) !important;">x: 216, y: 174</code> | |||
| | |||
|- | |||
| style="text-align: center;" | [[File:443_x225_y40.png|300px|link=]] | |||
| {{MapEmbed|xPos=225|yPos=40|size=300px|zoom=2|emoji=❌|outline=true|clean=true|coords=225,40,Overworld}} | |||
| style="text-align: center;" | [[Overworld]] | |||
<code style="border: 1px solid var(--border-color-base) !important; background: var(--bg-contrast) !important;">x: 225, y: 40</code> | |||
| | |||
|- | |||
| style="text-align: center;" | [[File:443_x343_y-82.png|300px|link=]] | |||
| {{MapEmbed|xPos=343|yPos=-82|size=300px|zoom=2|emoji=❌|outline=true|clean=true|coords=343,-82,Overworld}} | |||
| style="text-align: center;" | [[Overworld]] | |||
<code style="border: 1px solid var(--border-color-base) !important; background: var(--bg-contrast) !important;">x: 343, y: -82</code> | |||
| | |||
|- | |||
| style="text-align: center;" | [[File:443_x341_y-174.png|300px|link=]] | |||
| {{MapEmbed|xPos=341|yPos=-174|size=300px|zoom=2|emoji=❌|outline=true|clean=true|coords=341,-174,Overworld}} | |||
| style="text-align: center;" | [[Overworld]] | |||
<code style="border: 1px solid var(--border-color-base) !important; background: var(--bg-contrast) !important;">x: 341, y: -174</code> | |||
| | |||
|- | |||
| style="text-align: center;" | [[File:443_x427_y-172.png|300px|link=]] | |||
| {{MapEmbed|xPos=427|yPos=-172|size=300px|zoom=2|emoji=❌|outline=true|clean=true|coords=427,-172,Overworld}} | |||
| style="text-align: center;" | [[Overworld]] | |||
<code style="border: 1px solid var(--border-color-base) !important; background: var(--bg-contrast) !important;">x: 427, y: -172</code> | |||
| | |||
|- | |||
| style="text-align: center;" | [[File:443_x492_y-164.png|300px|link=]] | |||
| {{MapEmbed|xPos=492|yPos=-164|size=300px|zoom=2|emoji=❌|outline=true|clean=true|coords=492,-164,Overworld}} | |||
| style="text-align: center;" | [[Overworld]] | |||
<code style="border: 1px solid var(--border-color-base) !important; background: var(--bg-contrast) !important;">x: 492, y: -164</code> | |||
| | |||
|- | |||
| style="text-align: center;" | [[File:443_x173_y-151.png|300px|link=]] | |||
| {{MapEmbed|xPos=173|yPos=-151|size=300px|zoom=2|emoji=❌|outline=true|clean=true|coords=173,-151,Overworld}} | |||
| style="text-align: center;" | [[Overworld]] | |||
<code style="border: 1px solid var(--border-color-base) !important; background: var(--bg-contrast) !important;">x: 173, y: -151</code> | |||
| | |||
|- | |||
| style="text-align: center;" | [[File:443_x-291_y-394.png|300px|link=]] | |||
| {{MapEmbed|xPos=-291|yPos=-394|size=300px|zoom=2|emoji=❌|outline=true|clean=true|coords=-291,-394,Overworld}} | |||
| style="text-align: center;" | [[Overworld]] | |||
<code style="border: 1px solid var(--border-color-base) !important; background: var(--bg-contrast) !important;">x: -291, y: -394</code> | |||
| | |||
|- | |||
| style="text-align: center;" | [[File:443_x-286_y-336.png|300px|link=]] | |||
| {{MapEmbed|xPos=-286|yPos=-336|size=300px|zoom=2|emoji=❌|outline=true|clean=true|coords=-286,-336,Overworld}} | |||
| style="text-align: center;" | [[Overworld]] | |||
<code style="border: 1px solid var(--border-color-base) !important; background: var(--bg-contrast) !important;">x: -286, y: -336</code> | |||
| | |||
|- | |||
| style="text-align: center;" | [[File:443_x-261_y-308.png|300px|link=]] | |||
| {{MapEmbed|xPos=-261|yPos=-308|size=300px|zoom=2|emoji=❌|outline=true|clean=true|coords=-261,-308,Overworld}} | |||
| style="text-align: center;" | [[Overworld]] | |||
<code style="border: 1px solid var(--border-color-base) !important; background: var(--bg-contrast) !important;">x: -261, y: -308</code> | |||
| | |||
|- | |||
| style="text-align: center;" | [[File:443_x-296_y-258.png|300px|link=]] | |||
| {{MapEmbed|xPos=-296|yPos=-258|size=300px|zoom=2|emoji=❌|outline=true|clean=true|coords=-296,-258,Overworld}} | |||
| style="text-align: center;" | [[Overworld]] | |||
<code style="border: 1px solid var(--border-color-base) !important; background: var(--bg-contrast) !important;">x: -296, y: -258</code> | |||
| | |||
|- | |||
| style="text-align: center;" | [[File:443_x-185_y-233.png|300px|link=]] | |||
| {{MapEmbed|xPos=-185|yPos=-233|size=300px|zoom=2|emoji=❌|outline=true|clean=true|coords=-185,-233,Overworld}} | |||
| style="text-align: center;" | [[Overworld]] | |||
<code style="border: 1px solid var(--border-color-base) !important; background: var(--bg-contrast) !important;">x: -185, y: -233</code> | |||
| | |||
|- | |||
| style="text-align: center;" | [[File:443_x-154_y-257.png|300px|link=]] | |||
| {{MapEmbed|xPos=-154|yPos=-257|size=300px|zoom=2|emoji=❌|outline=true|clean=true|coords=-154,-257,Overworld}} | |||
| style="text-align: center;" | [[Overworld]] | |||
<code style="border: 1px solid var(--border-color-base) !important; background: var(--bg-contrast) !important;">x: -154, y: -257</code> | |||
| | |||
|} | |||
<!--{{MapEmbed|emoji=❌|outline=true|simple=true|coords=107,144,Underworld;-2,140,Underworld;-94,448,Underworld;-99,127;60,203;-12,312;-61,354;-104,451;-91,477;116,466;174,446;189,360;240,393;237,317;219,285;275,233;216,174;225,40;343,-82;341,-174;427,-172;492,-164;173,-151;-291,-394;-286,-336;-261,-308;-296,-258;-185,-233;-154,-257}}--> | |||
<!--{{Coordinates/Add|xPos=-99|yPos=127}} | |||
{{Coordinates/Add|xPos=60|yPos=203}} | |||
{{Coordinates/Add|xPos=-12|yPos=312}} | |||
{{Coordinates/Add|xPos=-61|yPos=354}} | |||
{{Coordinates/Add|xPos=-104|yPos=451}} | |||
{{Coordinates/Add|xPos=-91|yPos=477}} | |||
{{Coordinates/Add|xPos=116|yPos=466}} | |||
{{Coordinates/Add|xPos=174|yPos=446}} | |||
{{Coordinates/Add|xPos=189|yPos=360}} | |||
{{Coordinates/Add|xPos=240|yPos=393}} | |||
{{Coordinates/Add|xPos=237|yPos=317}} | |||
{{Coordinates/Add|xPos=219|yPos=285}} | |||
{{Coordinates/Add|xPos=275|yPos=233}} | |||
{{Coordinates/Add|xPos=216|yPos=174}} | |||
{{Coordinates/Add|xPos=225|yPos=40}} | |||
{{Coordinates/Add|xPos=343|yPos=-82}} | |||
{{Coordinates/Add|xPos=341|yPos=-174}} | |||
{{Coordinates/Add|xPos=427|yPos=-172}} | |||
{{Coordinates/Add|xPos=492|yPos=-164}} | |||
{{Coordinates/Add|xPos=173|yPos=-151}} | |||
{{Coordinates/Add|xPos=-291|yPos=-394}} | |||
{{Coordinates/Add|xPos=-286|yPos=-336}} | |||
{{Coordinates/Add|xPos=-261|yPos=-308}} | |||
{{Coordinates/Add|xPos=-296|yPos=-258}} | |||
{{Coordinates/Add|xPos=-185|yPos=-233}} | |||
{{Coordinates/Add|xPos=-154|yPos=-257}} | |||
{{Coordinates/Add|xPos=107|yPos=144|lvl=Underground}} | |||
{{Coordinates/Add|xPos=-2|yPos=140|lvl=Underground}} | |||
{{Coordinates/Add|xPos=-94|yPos=448|lvl=Underground}} | |||
{{Coordinates|simple=1}}--> | |||
Latest revision as of 07:41, 25 September 2025
| Treasure Map | |
|---|---|
| Inspect | It's a map to a hidden treasure location |
| Equipable | No |
| Can IOU | No |
| Stackable | No |
| Tradeable | No |
| Quest Item | No |
| HighLite Link | [443] |

Treasure Map (Tier 2) is a semi-rare item that can be obtained from medium level NPCs. Solving a treasure map involves going to the location shown on the map with a Shovel, and digging in the exact spot needed. Make sure to have at least 3-5 open inventory spaces to hold the newly acquired items.
If you need help finding a location, you can view the map below.
You can only possess one singular Treasure Map at a time, whether it's in your inventory or your Bank. This means you can't even hold multiple maps across different tiers simultaneously (e.g., Tier 2 and Tier 1). If a map proves too difficult to reach or complete, it's best to discard it in order to obtain a new one.
If you die while holding a treasure map, regardless of safe slots, it will be destroyed.
Item Sources[edit]
| Source | Quantity | Rarity |
|---|---|---|
| Charred Skeleton (Lvl 48) | 1 | 1/100 |
| Frost Giant | 1 | 1/100 |
| Knight (Lvl 60) | 1 | 1/100 |
| Forest Giant | 1 | 1/128 |
| Knight (Lvl 45) | 1 | 1/128 |
| Elf | 1 | 1/128 |
| Skeletal Mage | 1 | 1/128 |
| Charred Skeleton (Lvl 36) | 1 | 1/128 |
| Giant | 1 | 1/128 |
| Undead Pirate | 1 | 1/128 |
| Cursed Goblin | 1 | 1/128 |
| Goblin (Lvl 38) | 1 | 1/128 |
| Skeleton (Lvl 45) | 1 | 1/128 |
| Dark Monk | 1 | 1/128 |
| Giant Skeleton | 1 | 1/128 |
| Giant Hell Rat | 1 | 1/128 |
| Zombie (Lvl 40) | 1 | 1/128 |
| Frost Warrior | 1 | 1/200 |
| Forest Warrior | 1 | 1/200 |
Wastelands Increased Drop Rates[edit]
The Wastelands are the only area in HighSpell that offer increased Treasure Map drop rates. Monsters here (excluding Damogui) have a 20% higher chance to drop Treasure Maps[1], rewarding those who brave the risk.
Base Rewards[edit]
A Treasure Map (Tier 2) always contains the following item(s)
| Item | Quantity | Rarity | Value | |
|---|---|---|---|---|
| Coins | 2,000 | Always |
2,000 | |
Potential Rewards[edit]
A Treasure Map (Tier 2) grants five additional loot rolls upon completion. Each roll has a chance to succeed, with the following success rates (in order):
- 1st roll: 100%
- 2nd roll: 75%
- 3rd roll: 50%
- 4th roll: 25%
- 5th roll: 25%
Only successful rolls yield extra loot.
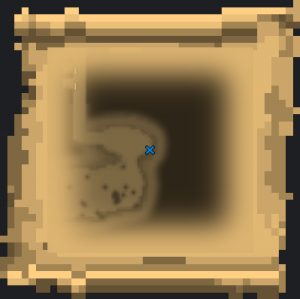
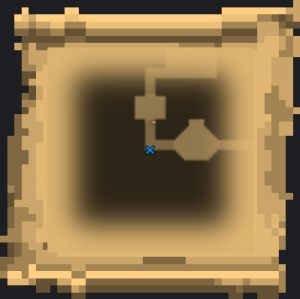
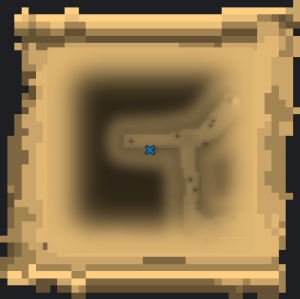
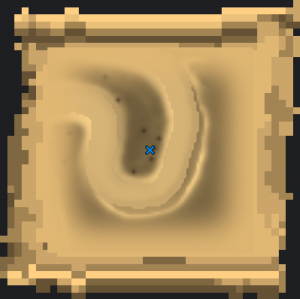
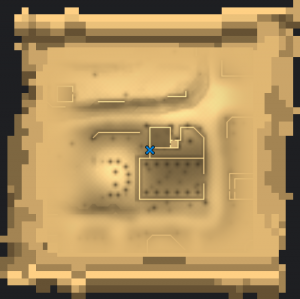
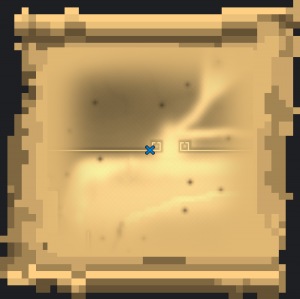
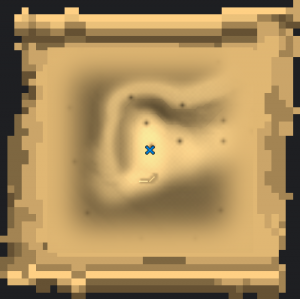
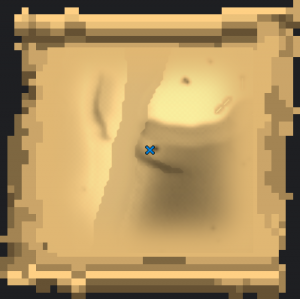
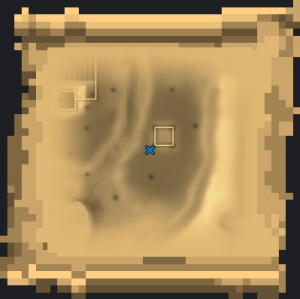
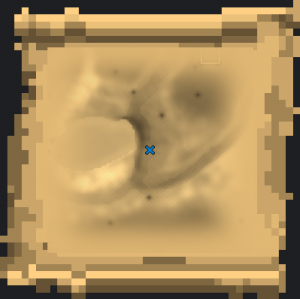
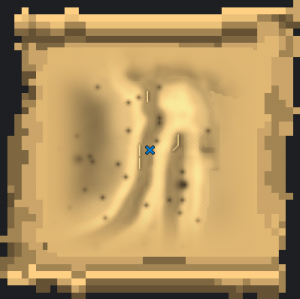
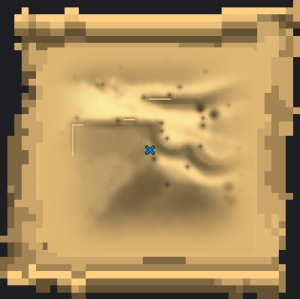
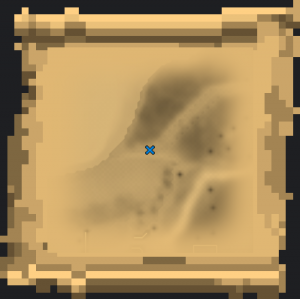
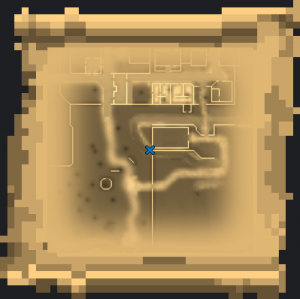
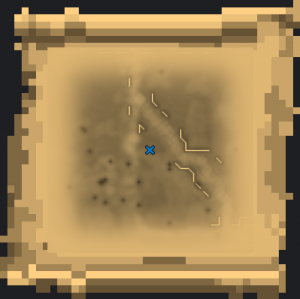
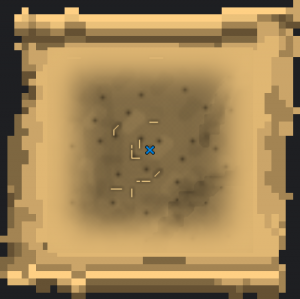
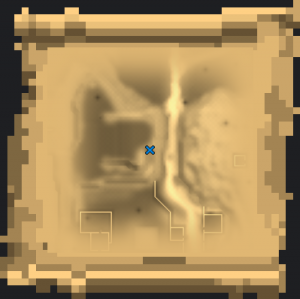
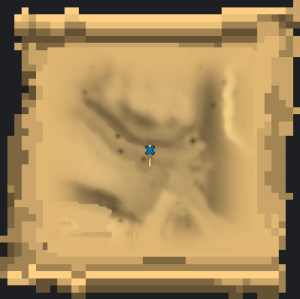
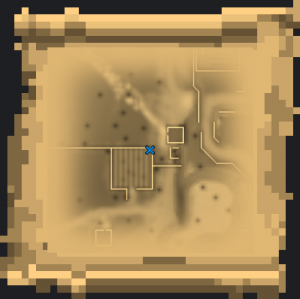
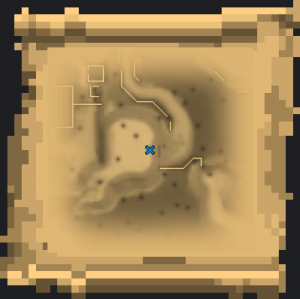
Possible Solutions[edit]
Mapped Locations[edit]
For a bookmark-friendly page with just the Tier 2 locations mapped out, see → Treasure_Map_(Tier_2)/Locations
Individual Maps[edit]
| Map | Location | Suggested Travel | |
|---|---|---|---|
|
Underworld
|
||
|
Underworld
|
||
|
Underworld
|
||
|
Overworld
|
||
|
Overworld
|
||
|
Overworld
|
||
|
Overworld
|
||
|
Overworld
|
||

|
Overworld
|
||
|
Overworld
|
||
|
Overworld
|
||
|
Overworld
|
||
|
Overworld
|
||
|
Overworld
|
||
|
Overworld
|
||
|
Overworld
|
||
|
Overworld
|
||
|
Overworld
|
||
|
Overworld
|
||
|
Overworld
|
||
|
Overworld
|
||
|
Overworld
|
||
|
Overworld
|
||
|
Overworld
|
||
|
Overworld
|
||
|
Overworld
|
||
|
Overworld
|
||
|
Overworld
|
||
|
Overworld
|
||